A small home multi purpose server or NAS using no more than 25 W.
Prelude:
I’ve been wanting to build myself a little server for months now. Ever since I’ve got rid of my old Pentium 233 MHz server with a singel 60 GiB harddrive.
It’s nice to have a machine running 24/7 so you can grab any data from any client in the house. It simplifies backup and allows for easier exchange of files.
Since I’m a student, the budget packet quite well from time to time, so economy was important. Especially in terrms of ownership. Realizing that electricity is costly these days, I’ve set a hard limit. The server couldn’t use more than 50 W/h.
The components
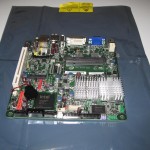
Intel recently released a new mainboard in the essential series. The Intel D945GSEJT desktop board. The board using the Mini-ITX form factor (170mm x 170 mm) and comes with some interresting specifications:
- Atom N270 CPU (Single core w. hyperthreading)
- 945GSE chipset
- Integrated graphigs (Intel GMA950).
- Max 2 GiB DDR2-5300 SO-DIMM RAM.
- 1Gbps onboard ethernet
- 2x SATA-150
- 1x PATA
- 1x Mini PCI-e connector
- 1x PCI 32 bit (regular PCI v. 2.3)
- Three onboard USB-plugs and four internal for front panel or rear panel header.
- 2+2 Audio w. SP/DIF (requires header)
- 2x RS232, 1x Parallel port
But what’s really interresting about the board is the power requirements. 12 Watts for the board only! Another important feature of the board is that it can be powered from a single 12 V/5A DC power brick. These are usually quite efficient (efficiency > 87%) and thus a perfectly good idea for a home server. No other motherboards that I could easily get a hold on came close to requiring this little power. I know about AMD’s Geode that uses only 5 W, but it’s also weaker in terms of processing power and only embedded HW distributers seems to be offering them, and not cheap! The Intel board however was about 120 USD, which seems fair.
You can find additional information on Intel’s website. I’m just writing why I chose the board.
I’ve also chosen to use two 1.5 TiB Western Digital Green power harddrives in RAID1 (mirror mode). I also do RAID in mirror mode as it provides the best data protection, and at a price of only about 130 USB/each, it’s arguably pretty stupid not to.
I’m also planning to buy a solid state drive (SSD) that goes into the Mini PCI-express connector, but I’m still uncertain if that would work. Google, weirdly enough, provides no answer to if it would work.
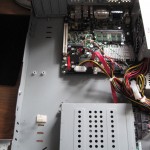
Everything is going to be put together in a Aopen A340 chassis, that I’ve also had laying around. The chassis comes with a power supply, but this is a 200 W model and will burn a lot of power into heat if you only draw like 10 % of it’s capacity, so this is eventually going to be removed and replaced by a more efficient 12 V/3.5 – 5 A power brick.
Test and assembly
The mainboard arrived in a brown bulk box, resonably protected. The board comes with two serial ATA cables, a powerplug that attaches on the mainboard and provides power to harddrives etc. when using a 12 Volt supply.
I haven’t actually bought the harddrives for the server yet, but I will in one of the coming days (or weeks). As for now, I’m just using a 300 GiB Maxtor Maxline III I found in my drawer.
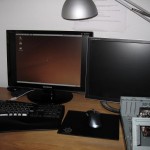
Assembly was easy. Rear plate in place, four screws, plug in power, use a monitor/keyboard/mouse from another PC while you’re installing the software. I chose to install Ubuntu Linux from a bootable USB-stick. Linux is free and comes with support for sharing files/printers, well, pretty much everything with Windows clients. I also plan to install a webserver (Apache) and MySQL later.
Measurements
The only real measurement I’ve done so far is to measure the power draw. 12 W for the mainboard with no attached harddrives and about 10-13 W for each harddrive (the Green power uses only about 7 W according to a lot of reviews) using a 12 V/3.5 A power brick from an LCD-screen. I have actually yet to buy one for the server, so I borrowed this one from my secondary workstation monitor.
Conclusion
A complete two disk home server for about 450 USD. Can’t say I’m not satisfied. The assembly took about half an hour while listening to music and being infocused, and the software installation about 10 minutes.
The best thing however, is the power reqirement. I don’t except the server to draw more than 25 Watts fully assembled with two modern disks. Perfect little server for the money.
Images